Category Archives: Project 1 : Interactive Object

Final Thoughts on the Design

I tried to keep the materials used in this project simple and in keeping with each other in terms of complimenting each other in tone, colour and materiality.

The linseed oil bought out the beauty in a plywood that was cheap to buy because of its specified use for shelving. I think I have managed to make it look like it was as low-cost as what it was and it had some beautiful grain patterns in it to start with that all I really needed to do was to choose where I cut wisely, sand it till it was as smooth as possible and apply several layers of boiled linseed oil to bring out the grain and give it a beautiful warm golden glow.

The lighter colours of the aluminium rods and the ply contrasted nicely with the black matte of the mounting board.

The use of a light coloured middle layer for the walls was a deliberate choice. I wanted to mirror the layering inherent in the ply and break up the heaviness of the black. The decision to use three layers of card was based on feedback from my tutor Steve about making it durable so that it  could withstand users getting in there and really trying to feel the object. The use of PVA was for the same reason as it is supposed to make the multiple layers stronger than if I had used a different adhesive. I do however have concerns that the type of black card I used marks a little too easily for my liking.

I settled on black stocking material for the barriers at the holes as it was matte in appearance like the mounting board, it had just the right amount of stretch and wasn’t too thick to inhibit the ability to feel the object too much. It also had just the right amount of opacity to still let some light in but prevent users from seeing the object until they opened the door and it prevented them from peering in to see how they were doing at sculpting. My only concern is that stockings aren’t known for their long-lasting durability and they will deteriorate over time.

I used brass rods over aluminium ones for the heart as they were thinner and the colour went nicely with the red of the heart. When it came to colouring that heart I could have used a pigment which would have made it opaque but I felt the dye held true to the origins of the heart, namely a glass bottle and it really does look quite beautiful in the light. I love that you can see the rods through it and the brass compliments the red nicely.

All in all I am happy with how my design finally turned out. I feel I have kept the materials and the use of them quite simple and I am glad that I decided to show not just the natural beauty of the materials but also the design process over disguising or hiding any of it.

Would I add improvements to the design? Damn straight I would! In fact I plan to over the summer holidays. I would still love to have interchangeable hidden objects stored in their own little boxes and then slotted into the object box without being seen. I would like to make the object box more modular as well so that the difficulty level could be ramped up that way as well as with increasingly complex hidden objects.

It would be good to make it so that the hand-holes can be changed, either for ones with no barrier  layer or with different types of barriers such as latex and rubber. That would also solve the issue of the gradually deteriorating stocking material as it could just be replaced when worn out. I am think of them being slid into place. The other option would be to have the objects in barrier sleeves but I can see issues with that such as seeing the object after and once again what to do when the material around it deteriorates.

I have also thought about adding mobility to it. Maybe it could be designed to fold up when not in use and maybe I could make the hidden object box spin round easily in one place  and then be able to turn another base layer that easily brings the sculpt box to where you are. All just possibilities at the moment to mull over in my subconscious until I have the time to work on it again.

I have really enjoyed doing this project. I loved trying to figure out solutions to problems I was having with the design and getting feedback from my tutor and my fellow students was always useful. I am glad I got the chance to finish this project. Though having said all that, I really struggle with the blogging aspect. It always seems time-consuming to me and I have the problem that once I have thought about something or done something I feel I finished it and to have to then sit down and write about it feels like I am just going over ground I have already travelled. I do understand how important it is to blog about the process while in it as it is a vital way for our learning facilitators to see what we are doing and give us feedback about our process. I guess it is something I will just have to work on.


Adventures in Box Making (The Conclusion: part two)

Adventures in Box Making (The Conclusion: part one)

In order to have a finished looking project, I made a stand for the user-created models to sit on and another box to house the plasticine. The stand was just a simple linseed oiled ply rectangle and I constructed the box from the three-layered card, linseed oiled ply, metal and thread. It was rectangular to go with the stand and I added a lid to keep the plasticine intact. I decided to keep it a simple rectangle as opposed to making another hexagon as I felt that a rectangular box looked more classy, the plasticine would fit in nicely and because its use differed from that of the hexagon-shaped boxes. The use of the same materials as the hexagons indicated the relationship between the different shaped objects. I kept it simple for the lid and the closures by using the same dumbbell shaped fittings as I used for the object box’s handle. I drilled a hole into the lid and glued one in as the lid’s handle and then used short ones at the back to attach the rubberized thread and slightly longer ones at the front to catch the straps of rubberized thread.


Adventures in Box Making (The Conclusion: part one)

Adventures in Box Making (The Hiccup)

I took everything I learnt from the earlier box-making and did it all differently from that attempt. Consequently, things went much better this time round. I was more methodical in my approach and plan better on how to approach the problem, thereby creating a better design in the end.

the finished boxes

I decided to reuse the wooden bases and tops from the previous boxes as they were still in pretty good condition. All I had to do was fill the holes with some wood filler, give them a quick sand down and apply more linseed oil. I used boiled linseed oil on all the wood to protect it and bring out the grain. I re-drilled the holes for the rods making sure they were slightly smaller in diameter than the rods for a snug fit. I decided to cut new rods for both boxes using the thicker ones for both boxes this time and hammered them into the bases.

Plywood base and tops construction process

This was how I was able to build a hexagon template using a ruler and a compass: http://mathworld.wolfram.com/Hexagon.html

I took measurements of the distance between the rods and drew up the dimensions for the sides of the boxes and the hand-holes one of the pieces of black mounting board with a 5mm margin between each side to allow for clean cutting. I then cut off the surplus card and stuck double-sided tape to the back surface of the drawn up board. I also applied double-sided tape to the middle layer for the sides and then sandwiched the three layers of card together so I could cut them all the hand-holes as one. I cut the holes with straight as opposed to curve lines this time as it left a neater finish and was a lot easier. Once the holes were cut I unstuck the layers and drew up the lines I wanted to cut out of the middle layer to accommodate the stocking material.

preparing the boards for construction of the walls

Now I could start on gluing the layers together with wood PVA this time round. The solid walls were easy as I glued all three layers together as one; piled books on top of the layers and left them to set for 12 hours before cutting. For the sides with the holes, I glued one of the black layers and the middle layer together and did the book thing again. I then diluted the PVA with a little water to make sure it soaked into the stocking fully. I then glued the stocking to the black layer so that it was flush with the middle layer. I had to use little map pins to stick the stocking to the card so it didn’t lift. It took forever to dry because I had put a bit too much water in the PVA and used too much PVA. I ended up buckling the card a little with the extra moisture. After this had dried I glued on the last layer; booked it and then cut it when dry. This worked out to be more effective than the way I had previously done it.

gluing in the stockings

I added some paper fasteners as latch fasteners for the door on the object’s box. I decided to do an all card design and because I was attaching the card to the rods using thread it meant they had enough move-ability  for one of the solid walls to act as door. Better looking than the wood one. For the door I also used a metal bar thingy as a handle by cutting a small hole out of the door, screwing the bar together and gluing the back of it to the inside of the door. I decided on stretchy rubber jewellery thread to secure the door to the box, so that all that the user needed to do was pull out and up to get it off the paper fastener.

hidden object box door and catches

I drilled holes down the sides of the walls for the thread and proceeded to attach the walls to the rods using waxed black thread. I had to attach all the walls on loosely before tightening up the thread because the space between the rods and the edges of the walls was too small to fit a needle through without breaking the needle in the process. Once this was done I could hammer the tops of the boxes on, obviously using a piece of scrap wood as buffer and only hammering lightly. Then I stuck the heart in the object box.

drilling holes and threading up walls

I took a different approach to putting the heart in this time. Instead of attaching the brass rods directly to the base and top, I attached them to a couple of small blocks of ply and then epoxy glued the blocks to the top and base. This meant I could make the brass rods slightly shorter than the height inside the box and by sliding one of the ply blocks further down the brass I could then add epoxy to the base of it then push it up to join with the base.

putting resin heart into hidden object box

Adventures in Box Making (The Conclusion: part two)


Adventures in Box Making (The Hiccup)

Adventures in Box Making (part four)

I had found my final design… I had decided to go with hexagons for the shape of both boxes. A hexagon was a given for the shape of the box with the heart in it, as it allowed access to all sides of the object inside. It made sense from an aesthetic perspective to make the other box a hexagon as well so it looked like a cohesive piece.

After talking to Steve, I went with his suggestion of only putting hand-holes on three sides of the box to increase the difficulty level slightly. You can still feel the object inside but perhaps not all of it, so you have to really focus on what you experiencing to try fill in any blanks that are there. Along with the stocking material, it makes it a case of  ‘how smart is your sense of touch and your brain’s ability to process the information to build up a mental model of the object based on what you can feel’. The modelling of that mental image in plasticine is evidence of your abilities. I think it is fair to say that regularly interacting with ‘the Intelligence of Touch’ you would get better at the process. Hence, the idea I had for multiple interchangeable hidden objects.

I learnt a lot from this experience. I learnt things like:

  • Don’t cut the different cards into the sizes needed and cut out the hand-holes before sticking them together. The sides won’t line up properly. Also, curves are really difficult to cut neatly.
  • Don’t forget to make the hole in the middle layer of card recessed so that when you glue the stocking in it will be nice and flush and you won’t need to make those sides 4 layers of card thick instead of three just to get it looking okay…
  • Don’t use that spray adhesive , it’s not potent enough and you didn’t stick a ton of books on the glued layers after, so in a day or two the layers are gonna start to separate.
  • Leave enough room between the outer edges of the card and the stocking layer because when it comes time to drill the holes for the thread, you’re gonna start chewing through stocking because it doesn’t drill too well and that’s gonna make your dremel go nuts and make holes larger than they should be.
  • The box with that gorgeous resin heart that you skewered with brass rod in it. Yeah, you know the one! You should have thought about that better. Brass is nice and bendy in an elasticky sort of way and the lovely aluminium rods you chose in that thickness you thought was appropriate for a tall skinny box are also bendy but they don’t spring back… And it was a good idea for all the rods to be hammered into the ply base and top, it makes it more stable and durable, the heart won’t move around when fondled by fingers. The execution however was a miserable failure, that springy brass just would not let hammer the top on properly, it kept wanting to let light and air in at the top and make sure those aluminium rods wouldn’t stay in their holes. Boy, was that a stressful endeavour!…
  • Then you realised at the 11th hour that you had no stand for the sculpted representations and no box to put the plasticine in! Really for the design to be truly cohesive, it would’ve been good to have these things.
  • And you were already bottoming out mood-wise, you didn’t realise it at the time but that anti-depressant of yours wasn’t being so effective anymore. The fogginess in your head, the inability to think, the near constant exhaustion you’d been suffering from, all symptoms you should have noticed but didn’t.That top not attaching properly and the realization you were missing pieces that would be good for the overall design was the nail in the brainpan and down… down… down you went.

I think that covers the nightmare well. Then I’ll post about being able to get the design finished thanks to my wonderfully understanding course co-ordinator, my doctor and the SSRI.

Adventures in Box Making (The Conclusion: part one)


The Intelligence of Touch (written description)


The Intelligence of Touch (images)


The Intelligence of Touch (video)

The Intelligence of Touch from pagesinclair on Vimeo.

An exploration into our sense of touch.
This is a video demo of my first year interaction design project that I did at the University of Victoria, Wellington. It shows how to interact with the designed object. This interactive object allowed users to explore their sense of touch and to gain an appreciation for the amazing ability we have to feel surface qualities and discern shapes by touch alone. It was purposefully built to shut out visual feedback to make the user focus on the use of touch to “see” an object.
If I had thought about it at the time I would have got rid of the furniture in the background and made sure that no cats could make a walk-on appearance during filming.
Reference:
Good Old Neon (2010). Arrange Yourselves from Best to Worst. On Radiant City [mp3 file]. Sourced from: http://freemusicarchive.org/music/Good_Old_Neon/Radiant_City_Sample-free_Version/10_Arrange_Yourselves_from_Best_to_Worst under an Attribution NonCommercial License
Arrange Yourselves from Best to Worst (Good Old Neon) / CC BY-NC 3.0

Adventures in Box Making (part four)

Adventures in Box Making (part three)

I thought some more about Steve comment about strength and about having perfectly scored lines for the aesthetic-worth of the piece. So, I bought a set of router bits for my dremel, some dowel, some black mounting board and some light coloured cardboard. I also bought some wood stain as I felt that I needed a darker, slightly red coloured wood to go with the black board.

I cut the cardboards into the size of the sides I wanted and then glued one piece of the light coloured card to the black card together with spray adhesive.

I then routed the dowel on two sides at around 20 degree angles, to use to join the card sides together. It was my first time routing and inevitably was rough and not even. I did enjoy using the dremel as a router, especially with the little router table I got for it. Yes, I have a problem, I collect gadgets, of all kinds. I like toys.

This was just another mockup to test out an idea and honestly I wasn’t too enamoured with the wood and card combination. There was just something not quite right about it, aesthetically.

I put another quick mockup together of how the heart would fit inside the box, using ply cut into a hexagon shape, metal rods and a resin casting of the heart. Then I added a card wall with the hand-hole  cut out in it so I could get my classmates to test out putting their hand through the hole. This was because I needed to check sizing of the hole against different sized hands to make sure the fingers of large hands could get in while small hands couldn’t get all the way in. This led to the idea of using a barrier that was thin and stretchy to ensure fingers only could get in.

As it turned out, the idea of stitching the card walls to metal rods attached to the box’s ply base and top was an idea I had been playing with as I liked the aesthetic of it. Steve, my tutor, also liked it when he saw the mockup I had done.

I had found my final design.

Adventures in Box Making (The Hiccup)


Adventures in Box Making (part three)

Adventures in Box Making (part two: Feedback)

Now to the final phase of box construction: the materials for the box! Got to make it look pretty!

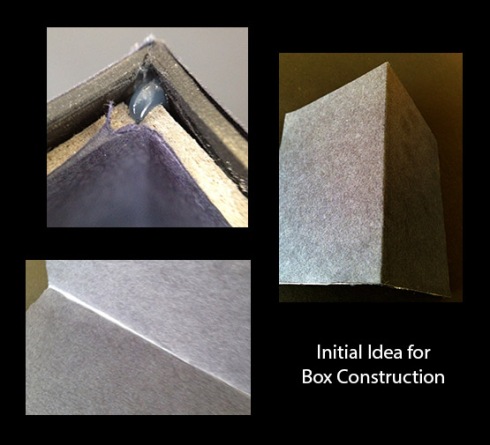
This initial idea germinated from the boxes I made for the storyboard. I wanted smooth tidy lines so wrapping the boxes in a lighter weight of card after scoring and constructing seemed like a good idea. Then I started thinking about it a bit more… Scoring the card to then fold was fine but there was still the issue of where the card would join. Then after that I would still have a visible edge where the lightweight card would meet. There was going to be an edge visible to some extent even if I managed a perfect glue job.

Good idea and the mock-up looked nice, but not good enough.

Steve and I chatted about options and he suggested scoring the lines to bend and bending them. As long as the scoring was very tidy it would look good. The problems with it however was the necessary join and the issue with strength. Steve pointed out to me that the corners would be weak and he was concerned about the overall durability of the cardboard as well.

Adventures in Box Making (part four)


Adventures in Box Making (part two: Feedback)

The Second Prototype

Adventures in Box Making (part one)

Feedback: I’m just going to quickly jot down the feedback for this prototype.

  • Not being able to see what you are sculpting as well as touching is a good idea. Requires more concentration on the tactile sense.
  • The shapes I made were too easy to figure out.
  • Perhaps one object is enough. Having to swap out objects could be time-consuming.
  • A timer was suggested.
  • The object wasn’t stable enough the way it was built.
  • The gloves were problematic due to varying hand sizes and were also not easy to use.
  • The holes in the touch box for the fingers were too big. Slender handed people could get their whole hand in. My tutor liked the narrower hole at the top of the box in terms of hand fit yet still prevented the hand from going in all the way.
  • I felt that for this project, trying to figure out how I would have multiple swappable objects that were also hidden before and during the interaction was perhaps a problem too big to solve in the time that remained.
  • Less hand holes for the touch box.
  • I also considered a turntable for the touch box so it could be spun round easily to try out a different hand hole, and a turntable for both boxes so after experiencing the touch box the user could just turn the sculpting box round to where they were.

Adventures in Box Making (part three)